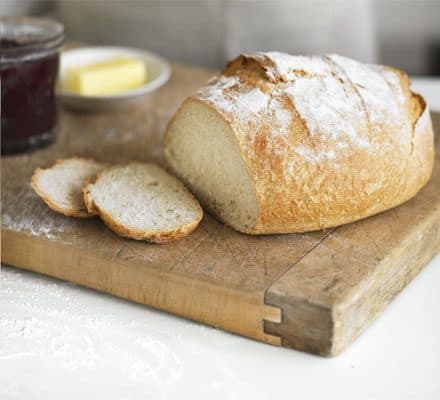
Country Loaves
Two big, blistered country loaves built on an overnight poolish, with bread flour, whole wheat, and a little rye for that deep, faintly sour bakery flavor. The dough asks for patience rather than skill — most of the work happens while you sleep.
Ingredients
Makes 2 round loaves (about 1 1/2 lb each)
Poolish (night before)
Dough
Instructions
- 1
Mix the poolish the night before
In a large bowl or a 2-quart container, whisk the 2 cups bread flour with the 1/4 teaspoon instant yeast, then stir in the 1 cup cool water until no dry flour remains. It will look like a thick pancake batter. Cover and leave it on the counter for 12 to 14 hours. That tiny amount of yeast is not a typo — it works slowly all night and builds the flavor that makes these loaves taste like they came from a bakery.
- 2
Check that the poolish is ready
In the morning it should be domed and webbed with bubbles, smelling yeasty and faintly like yogurt or beer. If the center has just begun to sink, that is the sweet spot — use it right away. A poolish that has fully collapsed and smells sharply of alcohol is overripe; it will still bake, but the loaves will be a touch flatter and more sour.
- 3
Combine the dough and let it rest
Add the 1 1/4 cups lukewarm water to the poolish and swish it around with your hand to loosen it. Add the bread flour, whole wheat flour, rye flour, and the 1 1/2 teaspoons instant yeast. Squeeze and fold with a wet hand until you have a shaggy, uniformly damp mass with no dry patches. Cover and rest 25 minutes — the flour drinks up the water during this pause and the dough becomes far easier to work with.
- 4
Work in the salt
Sprinkle the 2 1/2 teaspoons salt over the dough, wet your hand, and squeeze the dough through your fingers repeatedly for about a minute to distribute it, then fold the dough over on itself a few times until it comes back together smoothly. It will feel sticky and slack at this stage. That is correct — resist adding flour.
- 5
Build strength with folds
Over the next 90 minutes, give the dough three sets of stretch-and-folds spaced 30 minutes apart. For each set, wet your hand, grab the underside of the dough at one edge, stretch it up until it resists, and fold it over the center; rotate the bowl a quarter turn and repeat four times. You will feel the dough tighten noticeably by the third set and the surface will turn smooth and slightly glossy.
- 6
Finish the bulk rise
Cover and leave the dough undisturbed until it has risen by about three quarters and feels airy and jiggly, with a few bubbles visible along the sides of the bowl. At a comfortable 72°F kitchen, this takes roughly 1 to 1 1/2 hours after the last fold, for 2 1/2 to 3 hours of bulk fermentation total. Go by the look and feel rather than the clock — a warm kitchen can cut this in half.
- 7
Divide and preshape
Scrape the dough onto a lightly floured counter and cut it into two equal pieces, about 660g each if you are weighing. Working with one at a time, fold the edges into the middle to make a loose ball, then flip it seam side down and drag it toward you a few times against the counter to tighten the surface. Cover both rounds with a towel and let them relax for 20 minutes.
- 8
Shape the loaves
Flip one round over so the floured side is down. Fold the bottom third up over the center, fold the left and right thirds in, then roll the whole thing toward you into a taut ball, sealing the seam with the edge of your hand. Dust two bannetons or towel-lined bowls generously with rice flour and set each loaf in seam side up. Shape the second loaf the same way.
- 9
Proof
Cover the baskets and proof at room temperature for 1 to 1 1/4 hours, or refrigerate them overnight for a tangier loaf and better scoring. They are ready when a floured finger pressed 1/2 inch into the dough leaves a dent that springs back slowly and only partway. If it springs back instantly, give it another 15 minutes.
- 10
Preheat hard
At least 45 minutes before baking, put a Dutch oven with its lid on the middle rack and heat the oven to 500°F. A thoroughly saturated pot is what gives you the burst of steam and spring in the first ten minutes, so do not shortcut this. If you only have one pot, bake the loaves one after the other and keep the second in the fridge until its turn.
- 11
Score and bake
Turn one loaf out onto a square of parchment, seam side down. With a razor or very sharp knife held at a shallow angle, make one confident 4-inch slash across the top, about 1/2 inch deep. Lower it into the hot pot by the parchment, cover, and bake at 500°F for 20 minutes. Remove the lid, drop the oven to 450°F, and bake 20 to 25 minutes more, until the crust is deep reddish brown and the center reads 205 to 210°F. Reheat the empty pot for 10 minutes before baking the second loaf.
- 12
Cool completely
Move the loaves to a rack and listen for the crackling as the crust contracts. Wait at least 2 hours before cutting — the crumb is still setting, and slicing early leaves it gummy and stops the crust from crisping.
You did it! Help us bring baking back home by selling your delicious baked goods on Homebaked!
Baker's Tips
- 1.
Your kitchen temperature matters more than any time in this recipe. Below 68°F everything stretches out by an hour or more; above 78°F, start checking the bulk rise after 90 minutes.
- 2.
Rice flour does not absorb moisture the way wheat flour does, so a banneton dusted with it releases the dough cleanly every time. It is worth keeping a small bag just for this.
- 3.
If you want a more open, hole-filled crumb, cold-proof the shaped loaves overnight and bake them straight from the fridge. Cold dough also takes a scoring blade far more cleanly.
- 4.
No Dutch oven? Bake on a preheated stone or heavy sheet pan and pour a cup of boiling water into a metal pan on the rack below as the loaves go in. The crust will be slightly thinner but still excellent.
- 5.
Weigh if you can. Flour cups vary by as much as 20 percent depending on how you scoop, and in a lean dough like this one that swing is the difference between a supple dough and a stiff one.
- 6.
The rye can be swapped for more whole wheat if that is what you have, but keep it under about 20 percent of the total flour or the loaves will spread instead of rising.
Equipment
- Digital kitchen scale
- Large mixing bowl or 4-quart dough container
- Bench scraper
- Two 9-inch round bannetons or towel-lined bowls
- 5- to 7-quart Dutch oven with lid
- Bread lame or razor blade
- Instant-read thermometer
- Cooling rack
Storage
Store cut side down on a board or in a paper bag at room temperature for up to 3 days — the crust stays crisp this way. Never refrigerate; it stales bread faster than the counter. For longer storage, slice the cooled loaf, freeze in a zip-top bag with the air pressed out for up to 3 months, and toast slices straight from frozen. A whole frozen loaf can be revived by thawing at room temperature, then refreshing in a 350°F oven for 10 minutes.