How to Take Good Product Photos of Your Baked Goods
Your phone, a window, and a few habits are enough to make your bakes look as good as they taste.
For a home baking business, photos do the job a display case does in a storefront. Someone scrolling past has no way to smell your cinnamon rolls or taste the crumb on your banana bread, so the picture has to carry all of it. The good news is that food photography for small-batch bakers is much less about gear than people assume. A phone from the last few years, one decent window, and a repeatable setup will get you 90% of the way there. This guide walks through light, surfaces, styling, angles, and a simple shot list you can run through every time you bake.
Start With Light, Because Nothing Else Matters as Much
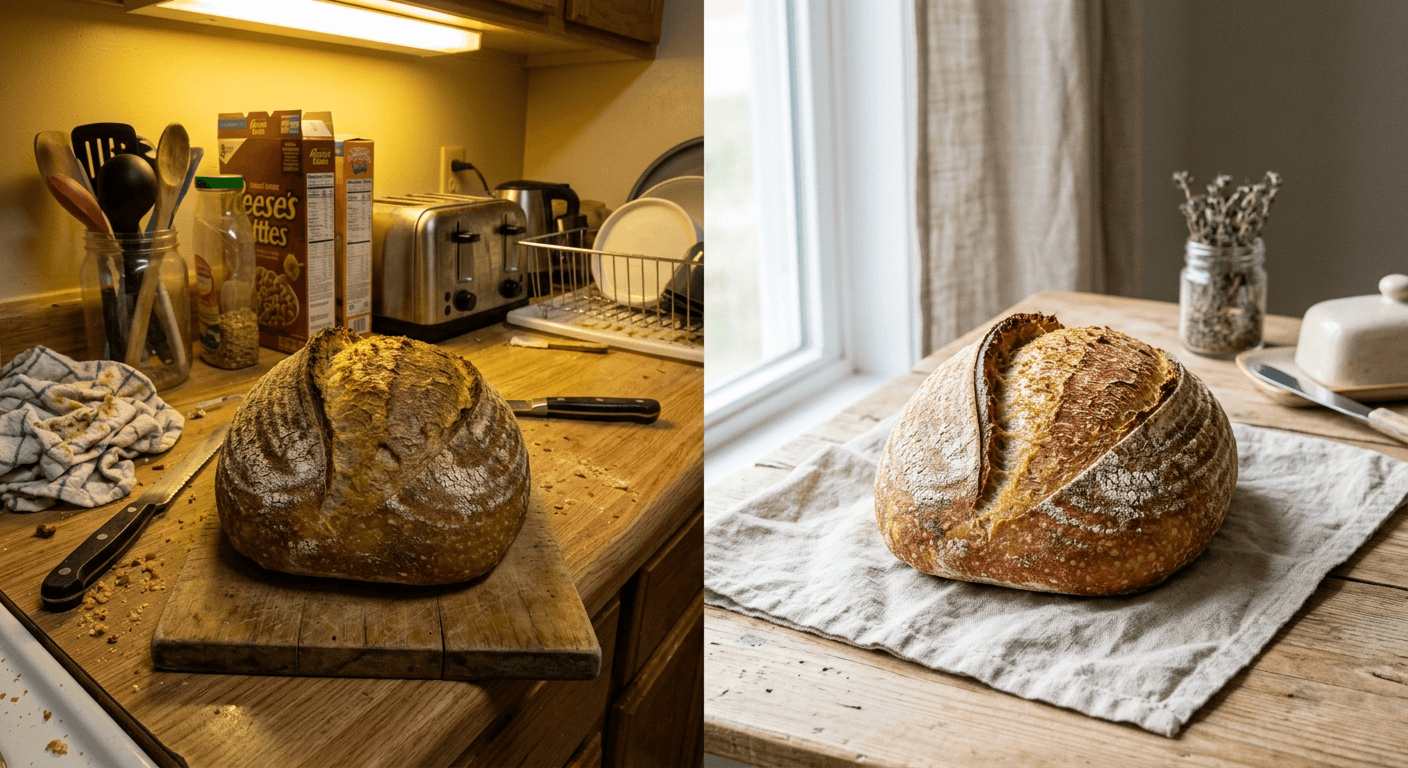
If you fix only one thing, fix your light. Overhead kitchen bulbs cast a yellow-orange tint and drop hard shadows directly onto whatever is below them, which is why so many home photos of cookies look greasy and flat. Natural daylight from a window does the opposite. It comes in at an angle, wraps around the food, and shows texture.
Set up next to the largest window you have and turn off every other light in the room. Mixing daylight with indoor bulbs confuses your camera's white balance (how it decides what "white" looks like), and you end up with colors that are half-orange and half-blue. One light source, always.
- Shoot in the late morning or mid afternoon. Harsh midday sun creates shadows with sharp edges that make crumb look chalky.
- If the sun is coming in strong and direct, tape a piece of parchment or hang a thin white curtain over the window. That diffuses the light, meaning it spreads it out and softens the shadow edges.
- Put the window to the side of your bake, not behind you. Light from directly behind the camera flattens everything out.
- Backlighting (window behind the subject) is the secret to anything with steam, glaze, or a sugar crust, because light coming through the back edges makes those things glow.
- Use a piece of white foam board or even a baking sheet lined with foil on the shadow side to bounce light back in and keep the dark side from going muddy.
Pick Surfaces and Backgrounds That Get Out of the Way
Your bake is the subject. Everything else exists to make it look better. Busy patterns, bright colors, and visible kitchen clutter all steal attention, and a half-visible dish rack in the corner of a frame will undo an otherwise lovely shot.
You do not need to buy a photo backdrop. A sheet of unfinished plywood, a marble cutting board, a square of textured tile from a hardware store remnant bin, a plain linen napkin, or a piece of matte poster board all work. Keep two or three on hand: one light, one dark, one with some texture. Light surfaces suit bright, airy bakes like lemon bars and meringues. Dark surfaces make chocolate, caramel, and anything deeply browned look rich.
- Matte beats glossy. Shiny surfaces throw reflections and hot spots.
- Neutral beats colorful. Whites, grays, browns, and black let frosting colors read true.
- Leave empty space around the bake. That breathing room (sometimes called negative space) makes a photo feel intentional, and it gives you room to crop for different platforms later.
- Check all four corners of the frame before you shoot. Corners are where stray crumbs, cords, and coffee mugs hide.
Style the Bake, Lightly
Styling is not about building an elaborate scene. It is about adding just enough context to make the food feel real and desirable. A few crumbs, a knife with frosting on it, a folded towel, a scattering of the ingredient that's inside the bake. Pick one or two props and stop there.
The single highest-impact styling move is showing the inside. A whole frosted cake is nice, but a slice pulled out so the layers are visible is what makes someone hungry. Cut into things. Break a cookie in half and show the melty interior. Tear a roll apart. Customers are buying what's inside, so show them what's inside.
- Shoot soon after baking, while glazes still have shine and bread still has steam.
- Brush a very light coat of neutral oil on crusts and pastry if they've dulled.
- Crumbs are your friend, but place them deliberately rather than letting them scatter.
- Props should be smaller or quieter than the bake. An oversized plate shrinks a cookie.
- Include a hand or a napkin occasionally to give a sense of scale.
Choose the Right Angle for the Right Bake
Three angles cover almost everything, and the shape of the bake tells you which to use.
- 1Overhead (straight down, 90 degrees). Best for flat things and arrangements: cookies on a tray, a pan of bars, a spread of macarons, decorated sugar cookies. It shows pattern and quantity.
- 2Three-quarter (roughly 45 degrees, the angle you see food at when sitting at a table). The most versatile and most natural-looking. Good for cupcakes, pies, loaves, and anything with a modest amount of height.
- 3Straight-on (eye level with the food, 0 degrees). Best for tall bakes where height is the whole point: layer cakes, stacked cookies, croissants, tall slices of focaccia.
Shoot every bake from at least two of these so you have options. Keep the camera level rather than tilted, get physically closer instead of using digital zoom (zooming on a phone just crops and loses detail), and tap the screen on the most important part of the bake so your camera focuses there and not on the background.
Run the Same Shot List Every Time
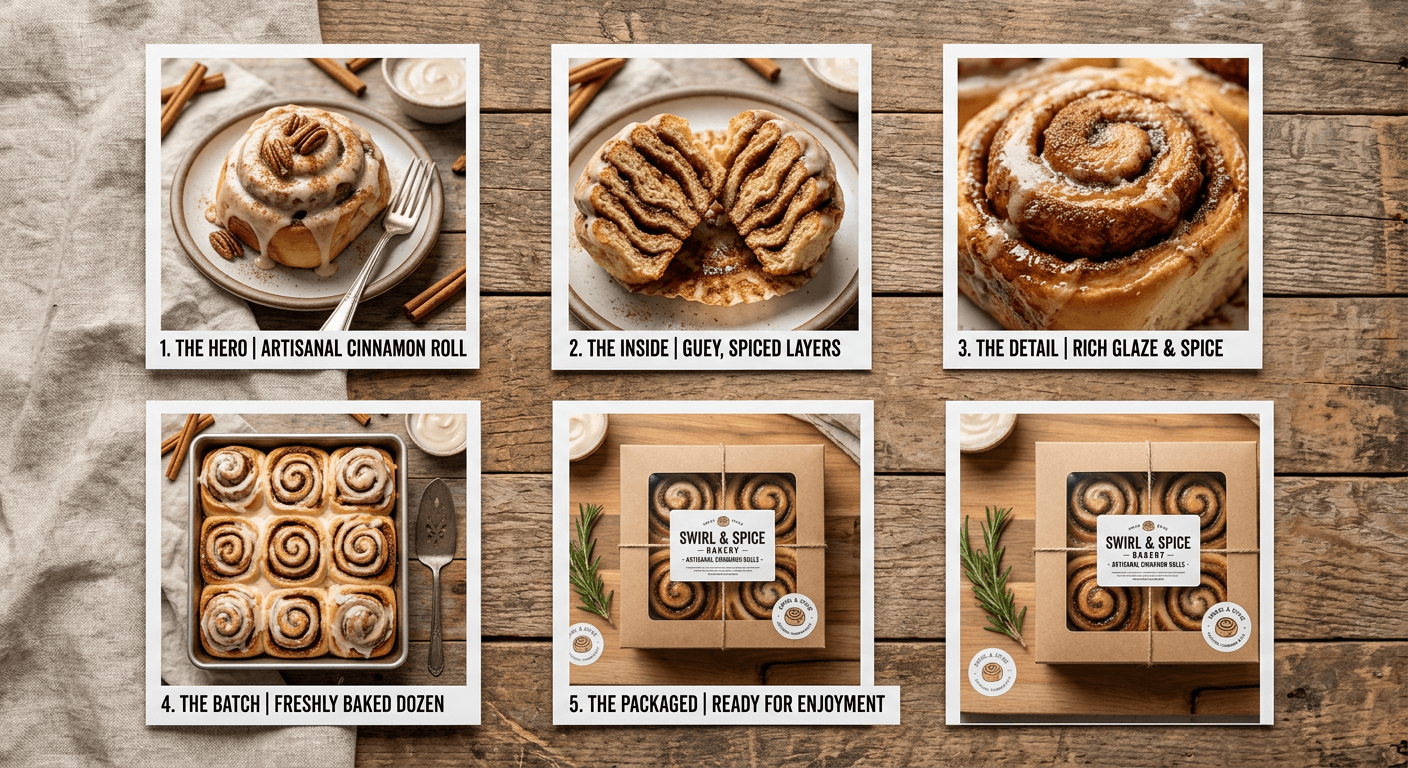
Consistency is what makes a small operation look established. When your photos share the same light, surfaces, and framing, a customer scrolling through sees a coherent brand instead of a scrapbook. The easiest way to get there is to shoot the same set of frames for every product.
- 1The hero shot. One clean, well-lit image of the whole product, styled simply. This becomes your main listing photo.
- 2The inside shot. A slice, a tear, or a bite taken out so the crumb or filling is visible.
- 3The detail shot. Close enough to see texture: sugar crystals, blistered crust, laminated layers, swirl pattern.
- 4The quantity shot. The full batch, dozen, or tray, so people understand what they're ordering.
- 5The context shot. The product boxed, bagged, on a table, or in someone's hands, which helps customers picture pickup day.
Shoot this list in one session with the bake at its freshest, then you're done. Five usable images per product is plenty to cover a storefront listing, a few social posts, and an order confirmation.
Edit Lightly and Consistently
Editing should make a photo look like what you saw in your kitchen, not like a different food entirely. Heavy filters, cranked saturation, and aggressive sharpening all make baked goods look artificial, and the gap between the photo and the real thing is a quick way to disappoint a first-time customer.
- Correct exposure first. Most bakery photos look better slightly brighter than the camera captured them.
- Nudge white balance toward warm if the photo looks blue, or cool if it looks orange, until the white parts of the frame actually look white.
- Add a small amount of contrast and a touch of sharpening. Small.
- Skip filters, or if you use one, use the same one every time.
- Crop to the shapes you actually need: square for most listings, vertical for stories and reels.
- Save your edit settings as a preset so every future batch matches without thinking about it.
Common Mistakes Worth Avoiding
- Shooting at night under kitchen lights. Wait for morning. The bake will still photograph well the next day if it's stored properly.
- Using flash. Direct flash flattens texture and blows out glazes.
- Cluttered backgrounds. Clear a two foot square and keep it clear.
- Photographing only finished, perfect, whole items. Process shots and messy, half-eaten shots often outperform polished ones.
- Inconsistent surfaces across a product lineup, which makes a catalog look cobbled together.
- Forgetting to wipe fingerprints and smudges off plates and boards before shooting.
Why This Is Worth the Hour
Roughly 65% of households say they'd rather get their bread and treats from a home baker than off a grocery store shelf, and photos are usually the first and only proof those people have that you exist and that you're good at this. A clear, well-lit picture of a laminated pastry does more persuading than any amount of description.
It also makes the business side far less painful. Once you've got a handful of strong images for each product, listing them somewhere is quick work. Platforms built for cottage bakeries, like Homebaked, will have a real storefront live in about five minutes, so the photos genuinely become the longest part of the setup. Shoot once, reuse everywhere, and refresh the hero shots when you change a recipe or your packaging.
Start with one product, one window, and one afternoon. Get five good frames of your best seller, see how they look next to what you were using before, and work through the rest of your lineup from there.