How to Get Packaging for Your Microbakery
A practical guide to sourcing boxes, bags, and labels that protect your bakes without eating your margins.
Packaging is the part of running a small baking operation that nobody warns you about. You've nailed your sourdough, you've got people asking when the next batch drops, and then you realize you have no idea how to actually hand someone six cookies in a way that doesn't look like a sandwich bag from the kitchen drawer. The good news is that packaging is a solvable problem with a fairly short learning curve. The goal of this guide is to help you figure out what you actually need, where to buy it, and how to keep the cost per order low enough that it doesn't quietly erase your profit.
Start With What the Food Needs, Not What Looks Cute
It's tempting to shop for packaging by scrolling pretty photos, but the first filter should always be function. Different bakes fail in different ways, and the wrong container will turn a great product into a disappointing one by the time it reaches the customer.
Think about three things for every item you sell: moisture, structure, and time. Moisture is whether the item needs to breathe or needs to be sealed. A crusty loaf goes soft and leathery in plastic, so it wants paper or a vented bag. A soft cookie goes stale in paper, so it wants something sealed. Structure is whether the item can be stacked or jostled, or whether it needs a rigid box with a little headroom. Time is how long the item sits between leaving your kitchen and getting eaten, which tells you how much protection you actually need to build in.
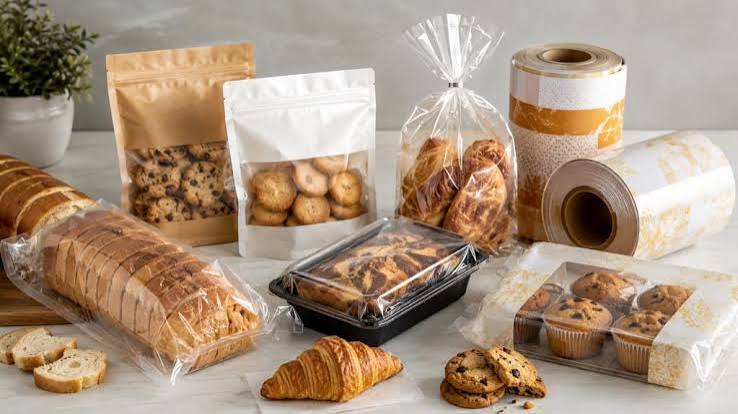
- Crusty breads: paper bags, bread bags with a window, or simple kraft sleeves. Avoid airtight plastic, which softens the crust.
- Soft breads, sandwich loaves, and enriched doughs: poly bread bags with a twist tie or clip, which hold moisture in.
- Cookies, brownies, and bars: clear cello bags (heat sealed or twist tied) for singles, rigid boxes with a sheet of deli paper for assortments.
- Cupcakes and decorated items: inserts or cupcake cavity boxes are worth the extra cost, because arriving with smeared frosting is worse than no packaging at all.
- Pies and cakes: rigid boxes sized to the pan, plus a non-slip liner or a dab of frosting on the base to keep the item from sliding.
- Laminated pastry: breathable boxes or bags only. Croissants in sealed plastic go limp within an hour.
Build a Starter Kit Instead of a Warehouse
The most common early mistake is buying one of everything. Packaging eats storage space fast, and most of it comes in cases of 100 to 500 units, so a scattered buying approach leaves you with a closet full of odd sizes you'll never finish. A better approach is to pick a small core kit that covers 80 percent of what you sell, then add specialty pieces only when a product earns it.
For most new cottage bakeries, a workable starter kit is one box size, one bag size, a roll of labels, and something to close things with. That's genuinely it for the first few months.
- 1Pick your flagship product, the one you'll sell the most of, and buy the right container for it in the smallest case quantity you can find.
- 2Add one general-purpose option that can flex across your other items, usually a mid-size kraft box or a clear cello bag.
- 3Buy a roll or sheet of blank labels you can print at home, or order printed stickers once your design is settled.
- 4Add a closure: twist ties, bag clips, baker's twine, or a small impulse sealer if you're bagging a lot of cookies.
- 5Add one "upgrade" item only when a specific product keeps failing in transit or a customer comments on it.
Where to Actually Buy It
Packaging sources break down into a few tiers, and most micro bakeries end up using two or three of them at once depending on volume.
- Restaurant supply stores: the underrated option. Local cash-and-carry suppliers sell bakery boxes, deli paper, and bags in case quantities at prices consumer retailers can't match, and you can see and handle the product before buying.
- Online packaging wholesalers: companies that specialize in food packaging, with a much wider size range and lower per-unit prices than general marketplaces. Minimums are higher, but the math usually works out well past 200 units.
- Business platforms with built-in supply: some tools built for home bakers bundle wholesale packaging access alongside the rest of the business. Homebaked, for example, offers wholesale packaging at roughly half what the same items cost on Amazon, which matters more than it sounds like when you're buying a case a month and your margin on a six-pack of cookies is a couple of dollars.
- General online marketplaces: fine for testing a new size or grabbing something fast, but the convenience premium is steep. Use them to sample, not to stock.
- Craft and party stores: good for ribbon, twine, tissue, and seasonal touches. Rarely the right call for your primary container.
- Local print shops: worth a conversation for custom-printed boxes or stickers once your volume justifies it, and often cheaper than you'd expect for simple one-color printing.
One habit that pays off: order samples before committing to a case. Most wholesalers will send a small sample pack for a few dollars or free. Holding the actual box, closing the actual lid, and setting your actual product inside tells you more in thirty seconds than a product listing does.
Sizing, the Thing Everyone Gets Wrong First
Packaging dimensions are listed as length by width by depth, and they describe the inside of the container, not the outside. Measure your product at its widest point and add a little clearance, usually a quarter inch to a half inch on each side, so items slide in without being squeezed. Depth matters more than people expect. A box that's too deep lets things tumble; a box that's too shallow crushes the top of whatever's inside when the lid closes.
- Measure the baked product, not the pan. Things spread, dome, and rise.
- For round items in square boxes, measure the diameter and match it to the box width.
- If you're shipping rather than handing off locally, your product box goes inside a shipping box with cushioning. Plan for both.
- Standardize where you can. Two sizes that nest or share a footprint are easier to store and buy in bulk than five one-off sizes.
Labels and What Has to Be on Them
Most places that allow home-based food businesses have specific labeling requirements, and they're usually the easiest rule to comply with and the easiest one to forget. Requirements vary by state, province, and county, so check your local cottage food regulations directly rather than copying what another baker does. That said, the typical list looks very similar from place to place.
- Your business name and address (some jurisdictions allow a registration number instead of a street address)
- The common name of the product
- A full ingredient list in descending order by weight, including sub-ingredients
- Allergen declaration for the major allergens
- Net weight or quantity
- A statement that the food was made in a home kitchen, often with exact required wording
- Any required permit or registration number
Practically speaking, the easiest setup is a two-sticker system. One sticker is your logo, which stays the same across everything and can be ordered printed in bulk. The second is the ingredient and info label, which changes per product and gets printed at home on blank label sheets as you need it. That way you're not reordering expensive custom stickers every time you tweak a recipe.

Making It Look Like Yours Without Custom Printing
Custom-printed boxes look fantastic, but the minimums are often 500 to 1,000 units and the setup fees are real. You do not need them to look professional. The trick is to pick plain packaging in a consistent color and add one branded element on top.
- Stickers are the highest-impact, lowest-cost branding you can buy. A good logo sticker on a plain kraft box reads as intentional.
- Stamps work beautifully on paper bags and kraft boxes, cost very little, and never run out in the way a sticker roll does.
- Pick a consistent accent: one twine color, one tissue color, one ribbon. Repetition is what makes things look designed.
- A small printed card with storage instructions and a reheating tip costs pennies and makes the whole package feel considered.
- Resist adding more than two branded elements per package. Restraint photographs better.
Keep an Eye on Cost Per Order
Every item that touches the customer's hand should be counted in your cost, not just the box. Add up the container, the label, the liner, the closure, the card, and the bag you hand it off in. It's normal for new bakers to discover their packaging costs more than their butter.
- 1List every packaging component for one typical order and write down the per-unit cost of each.
- 2Add them up to get your true packaging cost per order.
- 3Compare that number to your price. As a rough benchmark, many small bakeries aim to keep packaging under about 5 to 10 percent of the item's price.
- 4If you're over, look at the single most expensive component first. It's usually the rigid box or the custom insert.
- 5Recheck the math every time you raise your volume, since moving up a case size often drops the per-unit cost meaningfully.
Common Packaging Mistakes
- Boxing warm product. Trapped steam creates condensation, which makes crusts soggy and labels peel. Cool completely first.
- Buying custom print before your product line is settled. Your menu will change in the first year.
- Using packaging that can't survive a car ride. Test it by driving your own order around the block before a customer does.
- Forgetting the handoff. A sturdy carry bag or a flat-bottom tote is part of the package, especially for cakes and pies.
- Ignoring stackability. If your boxes can't stack, market days and multi-order pickups get chaotic fast.
- Over-wrapping. More layers isn't more premium, it's more cost and more waste.
A Note on Why This Is Worth Getting Right
Packaging is where a home bakery stops looking like a favor and starts looking like a business. Something like 65 percent of households say they'd rather get their bread and treats from a home baker than off a grocery shelf, and the thing that converts that goodwill into repeat orders is usually the small stuff: the box that didn't crush, the label that told them how to store it, the sticker they recognized the second time around. Get your containers and labels sorted early, keep the per-order cost honest, and you can spend the rest of your attention where it belongs, which is on the baking.